

Note: The author is an amateur developer who wanted to explore and document creating a Web3 app on the Pi platform. This post is a colorful journey and step-by-step breakdown of his Pi app development experience. It can inform developers how easy and intuitive it is to build a Pi app – even from the perspective of an inexperienced developer.
Enjoy reading this intriguing piece. Developers, see for yourself how fast it is to bring your app to tens of millions of the Pi community members! For more information, find the formal Documentation of the Pi Platform here, and a comprehensive Community Developer Guide here.
Language, and as he calls them, the “stunts,” are the author’s own. Reader discretion advised.
A step-by-step beginner’s guide to developing on the Pi platform
I’ve dabbled in Python development before, but I still suck at it. Pi Blockchain, here I come. Game on!
If you want to skip straight to the step-by-step, I’ll be sad, but I understand. Here’s a table of contents:
Intro
Meet Your Developer
What I Built
Tools I Used
About The Pi SDK
The Real Work
Setting Up The Python Environment
Building The Python App
Registering Your New App On Pi
Getting Your Pi API Key
Integrating The Python App With Pi
Running The Pi Sandbox
Setting Up Payment Processing
Using Authentication
Some Notes
Debugging, Ian-Style
Or, you can grab all of the code for the final app here: https://github.com/pi-apps/insult-o-meter.
My previous attempts at coding have been… rough. Half-hearted attempts, unfinished jobs. You name it.
So when I decided to write a blockchain app on the Pi platform and create a beginner’s guide, I started sweating. Oh, gods, I thought. Here we go again.
Spoilers: I was pleasantly surprised. It was, dare I say, kind of fun. Here’s my step-by-step guide to building a blockchain app with Pi.
What You Need
To follow along and/or to just grab my code and figure it out, you need:
- Some knowledge of Python 3.0
- Enough javascript knowledge to change text on a page
- Enough javascript knowledge to cut and paste code without breaking anything
- An iPhone or Android device
Meet Your Developer
I am:
- A very, very, very amateur Python developer. I still get confused when installing libraries. My most common ChatGPT prompt is, “What’s wrong with this code?”
- An even more amateur javascript developer. Actually, I don’t know a shred of javascript except what I copy and paste from Medium tutorials
- A 28-year digital marketer with declining brain plasticity
Also, I don’t know developer-speak. To me, a token is how I rode the subway in the 1990s. So pardon me if I occasionally say stuff like “that API thingie.” I include examples. Hopefully, it’ll make sense.
What I Built
I considered doing something basic, or wholesome, or basic and wholesome.
Nah.
Meet the Insult-o-meter. Get three creative insults, ready to deliver, all for the price of .01 PiCoin:

Trust me, it’s on-brand.
About The Pi SDK
The Pi SDK connects your app to all the Pi currency out there. Real crypto nerds will punch me in the spleen for this analogy, but the SDK is a credit card terminal in your store.
Here’s how it works:
- When someone visits your page, Pi kicks things off. The SDK connects to your app, confirms the user gave permission to access their Pi wallet, etc. If your app was a real store, this is when you turn the lights on and unlock the door
- Check for incomplete payments. There’s no great analogy for this. Don’t forget about this step. I did, and I suffered for it
- Patiently wait for the user to do something. You’re behind the counter or wandering around, straightening things on shelves while customers browse
- Create a payment. Pi sets up the transaction the same way you ask a customer for their credit card
- Then, do a whole bunch of stuff behind the scenes. You’ve swiped the credit card. Payment info is sent to the payment provider, which confirms that credit card number, checks for funds, and, if there are sufficient funds, transfers currency from the customer to you
- Return status. Finally, Pi says, “OK, all done. You’ve got coin!”
Setting Up The Python Environment
In case you’re not a Python expert like me (cough), here’s how I set up my environment:
- Open Terminal
- Run pipenv shell. That creates an enclosed environment where I can safely break things in an isolated environment. If you haven’t used it, check it out here. There are other virtual environment tools out there, but this one doesn’t break my brain
- Install the libraries listed above
That’s it.
Building The Python App
I won’t bore you with the details. I built a simple webpage with a Flask backend. The app reads insults from a text file, grabs a random insult, and passes it to the webpage using some basic javascript.
For now, we’re just building the app without SDK connectivity. That means three routes:
- /get_quote grabs a random quote from the text file. It doesn’t connect to Pi. It does connect to some javascript that counts the number of requested quotes. If the user has asked for more than three quotes, the javascript displays a modal with a button that connects to the approve route
- /back is boring
Pretty straightforward. You can get much fancier.
Be sure to note the app URL:

You’ll need this when you set up the app on Pi.
Registering Your New App On Pi
If you have the step-by-step, this is easy. I’m a helpful guy, so here’s the step-by-step:
Note: You’ll be using two apps: the Pi Browser, a web browser built on the Pi platform, and the Pi Mining App, which is how you generate all that Pi goodness. You’ll jump back and forth. It might drive you slightly bonkers, but it does make sense in the long run. Once you get used to it, it makes the workflow easier. Trust me. I wouldn’t lead you astray.
1. Get The Pi Mining App
Before you do anything else, you need to install the Pi Mining App. It’s a little app that runs on your iPhone or Android device. Get it on:
Google Play Store: https://play.google.com/store/apps/details?id=com.blockchainvault, or
App Store: https://itunes.apple.com/us/app/pi-network/id1445472541
It also lets you mine Pi currency. No GPU required.
Go ahead. I’ll wait.
All set? On to the next step.
2. Get the Pi Browser
Next you need to download the Pi Browser, a mobile web browser which gives you access to all applications built using the Pi SDK.
Google Play Store: https://play.google.com/store/apps/details?id=pi.browser
Apple App Store: https://apps.apple.com/us/app/pi-browser/id1560911608
All set.
3. Register Your App
Open the Pi App.
- Click the
 hamburger menu at the top left
 - Click
 Pi Utilities
 - Click
 Develop
 - Click
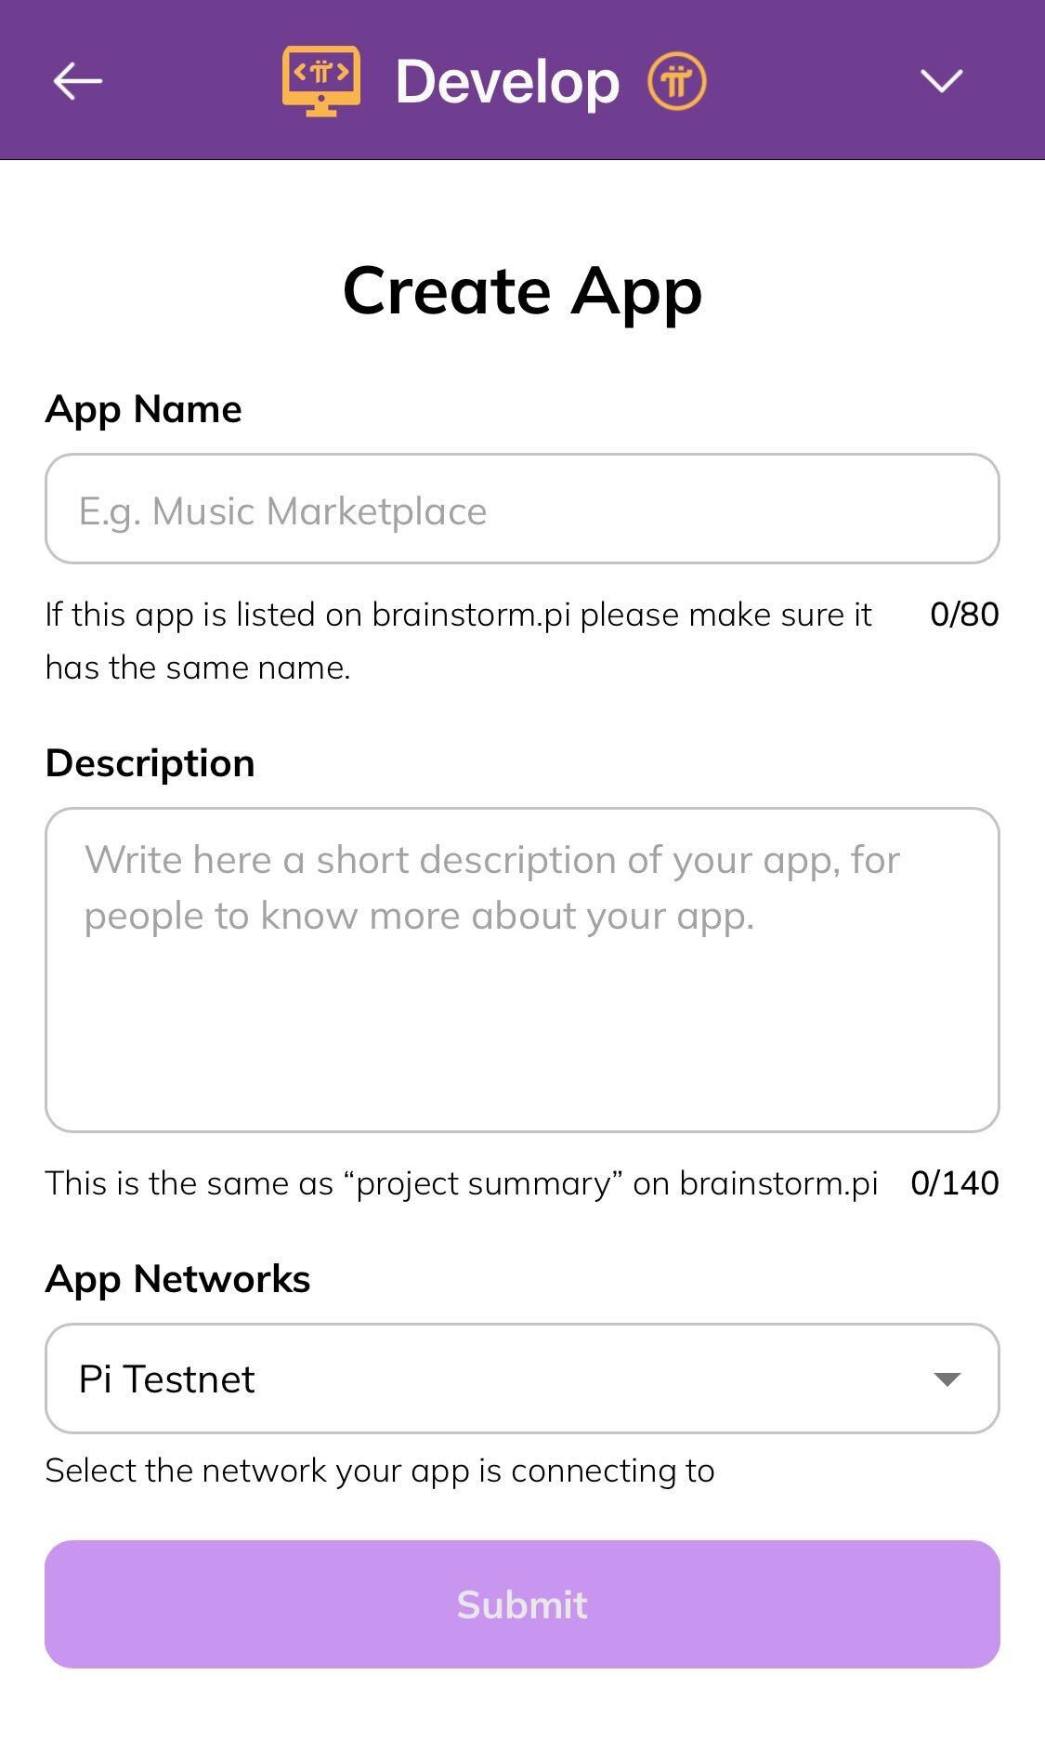
 New App
Type in your app name and description. For App Network I used Pi Testnet. No way in hell I was going to try to launch this thing in the real world. Plus, Testnet transactions are 100% pure, fake Pi, so you’re not charging anyone for a buggy app. I recommend you do the same.
You should see this handy screen:
The checklist shows where you’re at in the process of launching your app on Mainnet.
Right now, we need to set up a wallet.
4. Create/Connect Wallet
The app wallet is your bank account (sort of). You need to create and connect one.
- On the Developer Portal page for your app, click
 Wallet
 - Then click App Wallet > Generate New Wallet
More magical stuff will happen.
When you’re done, you may have to click the back button in the Pi Browser. I did.
Now, you can connect your wallet to this app. Click Wallet (if necessary) and then choose the wallet to connect.
Poof! You’ve got an app and a wallet.
5. Configure The App
Back on the Developer Portal page for your app, click  Configuration.
- Set Visibility as desired. I left mine set to Public
- Leave App Hosting set to Self Hosted
- Leave Your App’s URL blank unless you’re really brave and are launching your app to the world
- For Your App’s development URL, enter the address Flask showed you in Terminal (see “Building The Python App” above). For me, that is http://127.0.0.1:8080
- Optional: Enter URLs for your privacy policy, etc. These can be blank for now
Note: Don’t be a smartass and use https in your development URL. I did and got a sad face:

I went back and reset to http://127.0.0.1:3000, and everything worked.
Getting Your Pi API Key
Click  API Key.
Easy-peasy. Just don’t lose it.
Integrating The Python App With Pi
This is really, really hard.
I’m kidding. I kid. It’s easy. Just add the following to your Python app’s HTML code:
Javascript
<script src="https://sdk.minepi.com/pi-sdk.js"></script>
<script> Pi.init({ version: "2.0", sandbox: true }) </script>
Note: The sandbox flag is “true” only when running your app in the Pi Sandbox.
And then add this. It authenticates the user:
 Javascript
<script>
    // Authenticate the user, and get permission to request payments from them:
    const scopes = ['payments'];

    // Read more about this callback in the SDK reference:
    function onIncompletePaymentFound(payment) {
        paymentId = payment.identifier
        txid = payment.transaction.txid
        $.post('/payment/complete',
                {
                    paymentId: paymentId,
                    txid: txid,
                    debug: 'cancel'
                }
            )
    };

    Pi.authenticate(scopes, onIncompletePaymentFound).then(function(auth) {
console.log('woot!');
    }).catch(function(error) {
      console.error(error);
    });
</script>
Finally, add this to your Flask app.py:
Python
header = {
    'Authorization': "Key YOUR-API-KEY"
}
That provides your API key to the SDK. Please practice safe variable inclusion.
Running The Pi Sandbox
This got a little convoluted. By “a little,” I mean “Ian got confused,” which isn’t hard.
The Sandbox lets you work on your app, test transactions, etc., without exposing your app to the entire world. It’s a wrapper that connects the Python app to the SDK while keeping everything nicely quarantined.
- Make sure you’ve got the Python app running on your development machine
- In a browser, go to https://sandbox.minepi.com/app/[nameofapp]. Replace any spaces with dashes. For me, it was https://sandbox.minepi.com/app/the-insult-o-matic
- You’ll get an authorization screen
- Grab your phone. In the Pi Mining App, click the hamburger menu and select Pi Utilities
- On the Utilities screen, go to the bottom and click Authorize Sandbox
- Enter the code displayed in your web browser and click Continue
Victory! The first time you load the app, you should get this:
Note: This assumes you’ve got a Pi account with a little Pi in it, which you should. You installed the Pi Mining app and Pi Browser, after all.
Time So Far: < 2 hours, Including Pet Care
Not counting building the Python app, I just:
- Set up a Pi wallet
- Started mining Pi (because why not?)
- Set up an app
- Fed my cat. She got really impatient at this point
- Got all the necessary stuff to integrate with the Pi Blockchain
- Walked my dog. He was hopping around like a toddler in potty training
- Dried my dog’s feet before he tracked mud all over the house
- Stopped my dog from cornering my cat in the bedroom, where the cat would have flayed him alive
- Got my app up and running in the Pi sandbox
It took more time to write out the steps.
You’ll probably be faster than this Gen X coder. If you say it took you less than 1 hour, I’ll call you a showoff.
Setting Up Payment Processing
This is the “real” work. In quotes, because once you know how to do it, it’s pretty straightforward. I’m going to go through the step-by-step in a moment. For now, just paste this in:
1. Add This Code To Your HTML Page
Paste this in after the Pi.init code:
 Javascript
<script>
    // we're doing payments
    const Pi = window.Pi;
    // main payments function
    function createPayment() {
        const paymentData = {
            amount: .01,
            memo: "This buys you three more insults! What a deal!!!",
            metadata: { insultid: 123456 }
        };
        // the SDK does all this like magic
        const paymentCallbacks = {
            onReadyForServerApproval: (paymentDTO) => {
                paymentId = paymentDTO
                $.post('/payment/approve', {
                    paymentId: paymentId,
                    accessToken: accessToken
                })
            },
            onReadyForServerCompletion: (paymentDTO, txid) => {
                paymentId = paymentDTO
                txid = txid
                $.post('/payment/complete',
                        {
                            paymentId: paymentId,
                            txid: txid,
                            debug: 'complete'
                        }
                    )
            },
            onCancel: (paymentDTO) => {
                paymentId = paymentDTO.identifier
                $.post('/payment/complete',
                        {
                            paymentId: paymentId,
                            debug: 'cancel'
                        }
                    )
            },
            onError: (paymentDTO) => {
                console.log('There was an error ', paymentDTO)
                paymentId = paymentDTO.identifier
                $.post('/payment/error',
                        {
                            paymentDTO: paymentDTO,
                            paymentId: paymentId,
                            debug: 'error'
                        }
                    )
            },
            onIncompletePaymentFound: function(paymentDTO)
            {
                paymentId = paymentDTO.identifier
                console.log('onIncompletePaymentFound', paymentId)
                $.post('/payment/complete',
                        {
                            paymentId: paymentId,
                            txid: paymentDTO.transaction.txid
                        }
                    )
             }
        };
        Pi.createPayment(paymentData, paymentCallbacks);
    }
</script>
2. Add This Code To app.py
This sets up the Flask routes I mentioned before. These are just the Pi routes. You’ll need to set up any app-specific routes. For me, those are get_quote and back. Or just download the whole repository.
Python
@app.route('/payment/approve', methods=['POST'])
def approve():
    # Build the header for user authentication
    accessToken = request.form.get('accessToken')
    userheader = {
        'Authorization': f"Bearer {accessToken}"
    }
    paymentId = request.form.get('paymentId')
    approveurl = f"https://api.minepi.com/v2/payments/{paymentId}/approve"
    response = requests.post(approveurl, headers=header)
    userurl = "https://api.minepi.com/v2/me"
    userresponse = requests.get(userurl, headers=userheader)
    userjson = json.loads(userresponse.text)
    return(response.text)

@app.route('/payment/complete', methods=['POST'])
def complete():
    # Build the header for user authentication
    accessToken = request.form.get('accessToken')
    userheader = {
        'Authorization': f"Bearer {accessToken}"
    }
    paymentId = request.form.get('paymentId')
    txid = request.form.get('txid')
    userurl = "https://api.minepi.com/v2/me"
    userresponse = requests.get(userurl, headers=userheader)
    data = {'txid': txid}
    approveurl = f"https://api.minepi.com/v2/payments/{paymentId}/complete"
    response = requests.post(approveurl, headers=header, data=data)
    return(response.text)

@app.route('/payment/cancel', methods=['POST'])
def cancel():
    paymentId = request.form.get('paymentId')
    approveurl = f"https://api.minepi.com/v2/payments/{paymentId}/cancel"
    response = requests.post(approveurl, headers=header)
    return(response.text)

@app.route('/payment/error', methods=['POST'])
def error():
    paymentId = request.form.get('paymentId')
    approveurl = f"https://api.minepi.com/v2/payments/{paymentId}/cancel"
    response = requests.post(approveurl, headers=header)
    return(response.text)

@app.route('/me', methods=['POST'])
def getme():
    userurl = "https://api.minepi.com/v2/me"
    response = requests.post(userurl, headers=header)
    return(response.text)
These new routes do the following:
- /payment/approve connects to the Pi SDK and kicks off the entire payment/approval process. It’s fired by the javascript createPayment function when the user clicks ‘Pay.’ At this point, all sorts of magical stuff happens on the Pi platform. If the payment is approved, the SDK calls the complete route
- /payment/complete grabs a transaction ID (the unique transaction string), and fires the me route
- /payment/cancel and error are exactly what they sound like, except that I’m lazy, so both routes send a request to the SDK’s cancel URL
3. Make Sure They Connect
To connect your app to the Pi SDK, all you need to do is have something fire createPayment. For me, it’s the “Pay” button:
 Javascript
<a href="#" id="resetBtn" class="btn btn-primary mt-3" OnClick='javascript:createPayment();'>Pay</a>
When someone clicks “Pay,” that calls createPayment, which then calls the /payments/approve Flask route. Then the magic happens.
Time So Far: < 4 Hours, Minus Stupidity
At this point, I’ve got a working app. It shows me insults, charges me Pi, and does all the stuff in between.
That took about 4 more hours, with some extra time for:
- Mismatched brackets because I’m That Developer
- Some kind of grinding war of attrition between my cat and my dog that involved the cat on a coffee table, dangling her tail in front of Alfred, who then went insane trying to grab it
- A total failure on my part to understand what the SDK is really doing. Had I given even a little thought to that, I could’ve had this up and running far faster
I would save you that pain. Read the next section for a walkthrough of how this all works:
What It’s All Doing
At this point, you’re probably dizzy. That’s a lot of cutting-and-pasting or (hopefully) looking at the code repository. But very little insight into how this is actually working. Here’s a step-by-step walkthrough:
- First visit. The page opens, the SDK loads with Pi.init
- Pi.authenticate is called by the app and checks whether we’re, well, authenticated. If not, Pi shows a security warning and asks the user for permission to continue
- Assuming it all works out and the user gives permission, Pi.authenticate grabs user.username and writes it to the page for a nice, personalized feel
- The user clicks “Gimme an Insult” a few times. Each click calls the /get_quote route
- If the user has clicked more than three times, the app reveals a modal with a payment request (yes, this is pathetic and easy to evade with a popup blocker – this is for science, OK?)
- The user is so thrilled with the quality of the insults that they OK payment by clicking Pay
- When they do that, the modal calls createPayment
- createPayment calls onReadyForServerApproval, which fires the /payment/approve route in the Flask app, sending Flask the paymentId and accessToken
- The /payment/approve route sends a request with the payment ID and access token to the API
- In response, the API (hopefully) says, “OK, all good,” at which point the SDK calls onReadyForServerCompletion
- That calls the /payment/complete Flask route, passing it paymentId and, most important, txid (transaction id)
- The /payment/complete Flask route processes the payment
About onIncompletePaymentFound
This little function nearly drove me batty. It’s a great utility, checking for incomplete transactions and letting you call other functions. I didn’t understand that at first.
A couple of times, I broke stuff, and I ended up with transactions submitted but not completed. That led to an error-laden toilet bowl of death where I tried to debug, tried to submit another payment, failed, tried to debug again… It wasn’t pretty.
For my purposes, I had onIncompletePaymentFound call /payment/complete. Now, any time there’s a half-done transaction, the next time that user loads the app, it finishes the transaction and lets them keep generating insults.
These are tiny transactions, and it’s a test, so I’d rather just finish the transaction and keep testing. Plus, I want to ensure a steady flow of insults into the global economy.
In production, you’ll want to cancel the transaction or do something fancier.
Using Authentication: An Aside
The code provided already does all this. This is here for explanation.
Building the app wasn’t enough. Noooooo. I wanted to show the username in a couple of places. To do that, I had to use authentication. Normally, I hear “authentication,” and I think of the nightmare that is OAUTH. Here, though, the SDK did most of the work.
Change Authentication Javascript and Add A <span>
I changed the code block that authenticates the user to this:
 Javascript
// Authenticate the user, and get permission to request payments from them (added 'username' to provide username to API):
const scopes = ['payments','username'];
var accessToken
var username


// Read more about this callback in the SDK reference:
function onIncompletePaymentFound(payment) {
    paymentId = payment.identifier
    txid = payment.transaction.txid
    $.post('/payment/complete',
            {
                paymentId: paymentId,
                txid: txid,
                debug: 'cancel'
            }
        )
};

Pi.authenticate(scopes, onIncompletePaymentFound).then(function(auth) {
  accessToken = auth.accessToken
  username = auth.user.username
  $('#username').text(username); // writes username to the page
}).catch(function(error) {
  console.error(error);
});

accessToken = auth.accessToken
username = auth.user.username
$('#username').text(username); // writes username to the page
}).catch(function(error) {
  console.error(error);
});
- Adding the username scope and creating the username variable lets the app get the user’s account name from the API and then use it on the page
- Adding the accessToken and username to Pi.authenticate hands the information off to the page and shows it here:

I also added a <span> with the id #username. That’s where the user’s account name appears on the page.
Add /me To My Flask Routes
In app.py, I added the “/me” route:
Python
@app.route('/me', methods=['POST'])
def getme():
    userurl = "https://api.minepi.com/v2/me"
    response = requests.post(userurl, headers=header)
    return(response.text)
This makes the call to the API and retrieves the user’s account name.
I also added a few lines of code to the /payments/complete route. But because I’m lazy, I already included that in the cut-and-paste block above. If you download the entire app repository, it’s all set.
Done!
That’s it! I now have a complete app. It provides a few insults, personalizes them, and even automatically copies a prewritten message (insult included) for easy emailing, posting, or anything else:

Debugging, Ian-Style
I used console.log. A lot. If you’re a beginner like me, learn more about it here.
Quest Complete
Did I level up? I’m not sure. But I never, ever thought I’d be able to incorporate blockchain technology into anything I built. I didn’t realize it was as simple as adding some javascript or that I could use my old friend Python to do the work.
So it’s a tie: Blockchain 1, Ian 1
Both the cat and the dog received treats for being (sort of) well-behaved, so they get 2 points each.